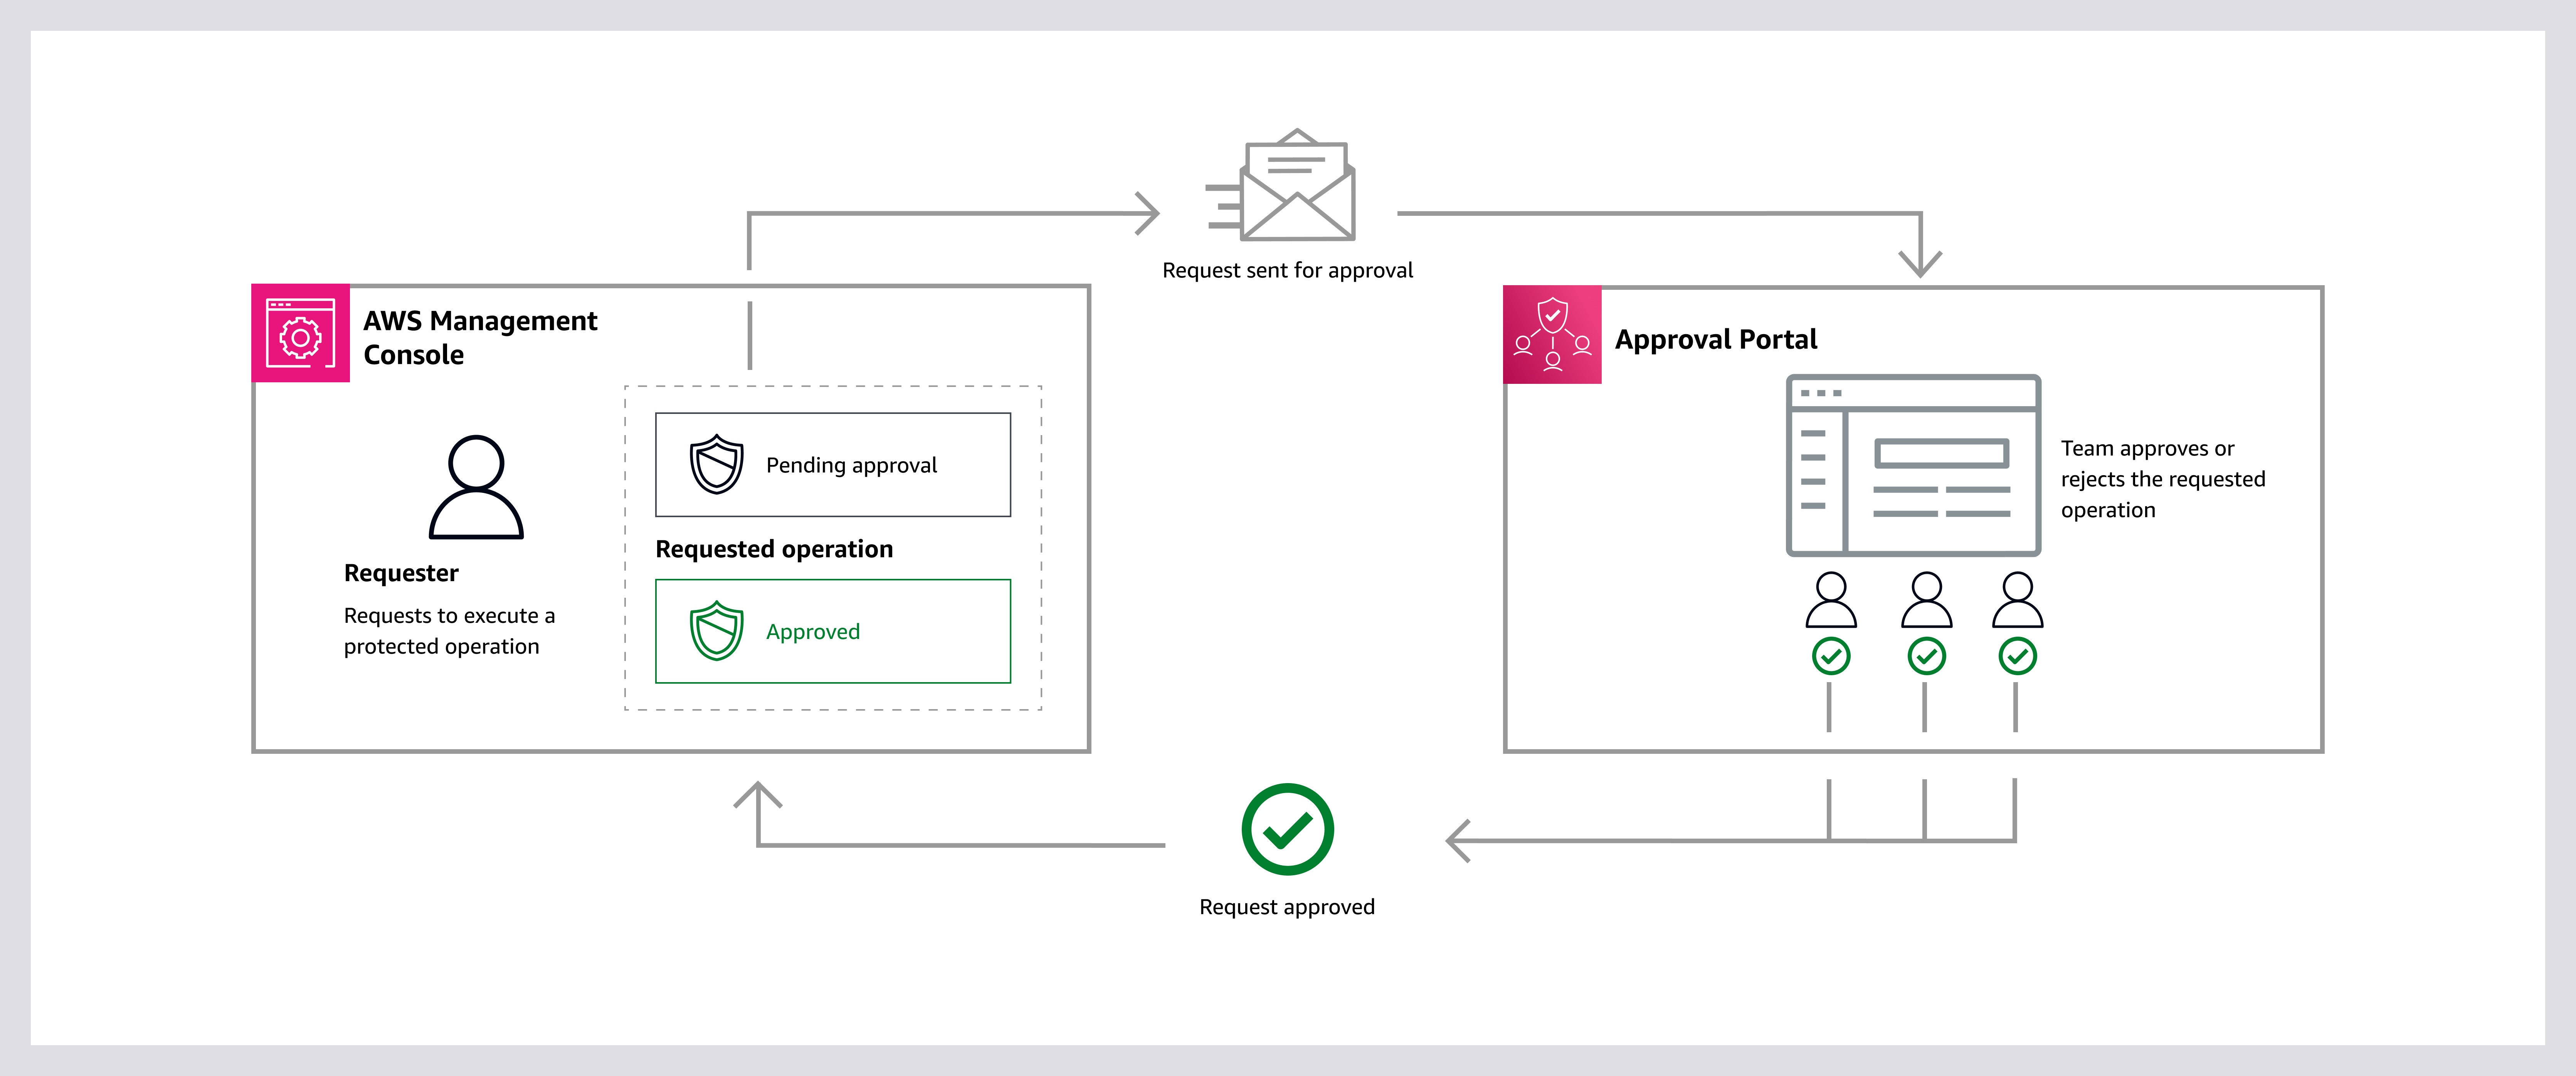
AWS Backup ransomware protection helps secure VMware workloads against modern ransomware attacks by using immutable backups, logical air-gapped vaults, and cross-account isolation.
This guide details the entire process of deploying an enterprise-level backup solution that safeguards against ransomware attacks, by using three important security layers:
- Immutable Storage – Backups cannot be deleted by anyone, including attackers with administrative access
- Logical Air-Gap Vault – Securely isolated storage environment that uses AWS controls (like separate accounts, restrictive IAM, and immutability) to prevent access or tampering
- External Approval Authority – Approval team located in separate AWS account outside your organisation
Architecture Overview
Security Model
Production Environment
- Your production AWS accounts and VMware environment
- Daily automated backups with Changed Block Tracking
- Standard backup vault for operational restores
External Approval Authority
- Completely separate AWS account (not part of your organisation)
- Contains approval team of 3+ trusted senior executives
- MFA enforcement for all team members
- Only function: approve emergency backup access
Recovery Environment
- Used exclusively during disaster recovery
- Can request access to protected backups
- Access granted only after multi-party approval from external team
How This Stops Ransomware Attacks
Traditional Attack Pattern:
- Attacker gains access to production systems
- Escalates privileges to administrator level
- Deletes or encrypts all backups
- Encrypts production data
- Demands ransom
How Our Architecture Prevents This:
- Step 3 Fails: Compliance-mode locks prevent backup deletion by anyone
- Air-Gapping: Backups logically isolated, not directly accessible
- External Approval: Attacker cannot compromise approval team (separate organization)
- Multi-Party Requirement: Need 2+ trusted individuals to approve access
- Result: Backups remain protected; organization can recover without paying ransom
Prerequisites
Production Environment Requirements
AWS Infrastructure:
- AWS Organisations with minimum 2 accounts
- One account designated as backup delegate administrator
- Site-to-Site VPN between on-premises datacenter and AWS / Internet connectivity from VMware environment to AWS
VMware Environment:
- VMware vSphere 6.7 or later
- vCenter Server operational
- Service account with backup permissions
- Available resources: 4 vCPUs, 8GB RAM, 80GB disk for gateway VM
Network Requirements:
- VPN bandwidth: 100 Mbps minimum (1 Gbps recommended)
- Network latency: Under 50ms recommended
- Firewall permits: HTTPS (port 443) to AWS endpoints
- DNS resolution for AWS service endpoints
External Approval Account Requirements
New AWS Account:
- Must be completely separate from your organisation
- Cannot be member of any AWS Organisations
- Dedicated email address (example: [email protected])
- Root account secured with hardware MFA token
Trusted Approvers (3 minimum):
- Senior executives with authority to approve emergencies
- Examples: CTO, CISO, Infrastructure Director, etc
- Must be available 24/7 for emergency response
VMware Backup Gateway Setup
Configure AWS Organisations Delegation
Purpose: Designates your backup account as central backup administrator for entire organization.
Instructions:
- Sign in to your AWS Organizations management account
- Navigate to AWS Organizations service
- Go to Services → AWS service access
- Enable access for AWS Backup service
- Navigate to Delegated administrators
- Register your backup account as delegated administrator for AWS Backup service
- Verify delegation appears as “Active”
What This means:
- Backup account can manage backups across all organization accounts
- Doesn’t require management account access for daily operations
- Centralizes backup management and policies
- Download and Deploy Backup Gateway
Installs virtual appliance that connects AWS Backup to your VMware environment.
In AWS Backup Console (Backup Account):
- Select your region (example: EU-WEST-2 for London)
- Navigate to AWS Backup → External resources → Gateways
- Click Create gateway
- Download the OVF template file (approximately 1.2 GB)
- Save as:
aws-appliance-latest.ova
In VMware vSphere Client:
- Connect to vCenter Server
- Right-click parent object (datacenter or cluster)
- Select Deploy OVF Template
- Choose Local file and select downloaded OVA file
- Provide gateway name:
Backup-Gateway-Production - Select compute resource (cluster or host)
- Critical: Select storage disk format: Thick Provision Lazy Zeroed
- Select management network (must have internet access)
- Complete deployment wizard
Configure VM Settings Before Power-On:
- Right-click deployed gateway VM → Edit Settings
- Verify configuration:
- CPU: 4 vCPUs
- Memory: 8 GB (set memory reservation to 8192 MB)
- Hard Disk: 80 GB
- Go to VM Options → VMware Tools
- Enable: Synchronize Time with Host
- Enable: Synchronize at startup and resume
- Save settings
Configure Gateway Network Settings
Power On Gateway VM:
- Right-click gateway VM → Power → Power On
- Open VM console
Initial Login:
- Default username:
admin - Default password:
password - You’ll be prompted to change password immediately
- Create strong password (minimum 12 characters, mixed case, numbers, symbols)
Configure Static IP Address:
- At main menu, select Configure Network
- Choose Static IP configuration
- Enter network details:
- IP Address: (assign from your management network range)
- Subnet Mask: (example: 255.255.255.0)
- Default Gateway: (your network gateway)
- Primary DNS: (your internal DNS server)
- Secondary DNS: (backup DNS, can use 8.8.8.8)
- Save configuration
Test Network Connectivity:
- At main menu, select Test Network Connectivity
- Gateway tests:
- Basic network connectivity
- DNS resolution
- Internet access
- AWS endpoint reachability
- Time synchronization
- All tests should show “OK” or “PASS”
- Record the gateway IP address for next step
Firewall Requirements:
If you have firewalls between gateway and internet, allow outbound traffic:
- Destination: *.backup.[your-region].amazonaws.com (port 443)
- Destination: *.s3.[your-region].amazonaws.com (port 443)
- Destination: time.aws.com (port 123 UDP)
- No inbound rules required (all connections are outbound)
Register Gateway with AWS
In AWS Backup Console:
- Navigate to External resources → Gateways
- Click Register gateway
- Enter gateway details:
- Gateway IP Address: (IP from previous step)
- Gateway Name:
Production-VMware-Gateway - Gateway Timezone: (select your timezone)
- Add tags for organization:
- Environment: Production
- Purpose: VMware-Backup
- Location: On-Premises
- Click Register gateway
Verify Connection:
- Wait 2-5 minutes for connection
- Status should change from “Registering” to “Connected”
- Green indicator shows healthy connection
- If connection fails, verify firewall rules and network connectivity
Integrate VMware vCenter
Create vCenter Service Account:
In vCenter Server, create a service account for AWS Backup with these permissions:
Required Permissions:
- Virtual Machine: All inventory, configuration, state, and provisioning operations
- Datastore: Browse datastore, allocate space
- Network: Assign network
- Apply at: Datacenter or Cluster level
- Propagate to child objects: Yes
Add Hypervisor in AWS Backup:
- Navigate to External resources → Hypervisors
- Click Add hypervisor
- Select your registered gateway
- Choose Hypervisor Type: VMware vCenter
- Enter connection details:
- Host: (vCenter IP address or hostname)
- Port: 443 (default)
- Username: (service account created above)
- Password: (service account password)
- Provide hypervisor name:
Production-vCenter - Click Test Connection to verify
- Click Add hypervisor
Wait for VM Discovery:
- AWS Backup automatically discovers all VMs (5-10 minutes)
- Progress shown in console
- After completion, view discovered VMs under External resources → Virtual machines
Create VMware Tags for Backup Selection
In vSphere Client:
- Navigate to Tags & Custom Attributes → Tags
- Click New Tag Category
Create Tag Category:
- Category Name:
backup - Description:
Backup schedule - Cardinality: Single value per object
Create Tags Under ‘backup’ Category:
- Tag: daily
- For VMs requiring daily backups
- Example: Production databases, critical applications
- Tag: weekly
- For VMs requiring weekly backups
- Example: Development servers, secondary systems
- Tag: monthly
- For VMs requiring monthly backups only
- Example: Archive systems, long-term storage
- Tag: none
- For VMs excluded from backups
- Example: Temporary VMs, easily recreated systems
Apply Tags to VMs:
- Right-click each VM in vSphere inventory
- Select Tags & Custom Attributes → Assign Tag
- Choose appropriate backup tag
- VM will now be automatically included in matching backup plan
Tagging Strategy Example:
- Mission-critical database servers:
backup:daily - Application servers:
backup:daily - File servers:
backup:daily - Development servers:
backup:weekly - Test environments:
backup:none
Create Backup Plan
In AWS Backup Console:
- Navigate to Backup plans
- Click Create backup plan
- Select Build a new plan
Backup Plan Configuration:
Plan Name: VMware-Production-Daily-Backup
Backup Rule Configuration:
- Rule Name:
DailyBackupRule - Backup Vault:
Default(temporary; will add air-gapped vault in Phase 2) - Schedule:
- Frequency: Daily
- Time: 3:00 AM (choose off-peak time for your organization)
- Timezone: Your local timezone
- Backup window start: Within 1 hour
- Completion window: Within 3 hours
Lifecycle Settings:
- Transition to cold storage: 30 days
- Expire/Delete: 90 days
- (Air-gapped vault will have longer retention)
Tags for Recovery Points:
- BackupType: Daily
- Environment: Production
- Automated: True
Create Backup Selection:
After creating plan, immediately create backup selection:
- Selection Name:
Tagged-VMs-Daily-Production - IAM Role: Select Default role (AWS creates automatically)
- Resource Selection: Include specific resource types
- Resource Type: Select
VM(Virtual Machine)
Define Selection by Tags:
- Tag Key:
backup - Tag Value:
daily - Condition: Equals
Optional Additional Filter:
- Tag Key:
environment - Tag Value:
production - This ensures only production VMs with daily tag are backed up
- Click Assign resources
What Happens Now:
- AWS Backup automatically discovers all VMs with
backup:dailytag - First backup runs at next scheduled time (3:00 AM)
- You can also trigger manual backup immediatel, for testing
Execute First Backup
Trigger Manual Backup (Don’t Wait for Schedule):
- Navigate to Protected resources
- Locate a test VM (non-production, with sample data)
- Click the VM name
- Click Create on-demand backup
- Select backup vault: Default
- Use default IAM role
- Start backup immediately
- Click Create on-demand backup
Monitor Backup Progress:
- Navigate to Jobs → Backup jobs
- Find your job at top of list
- Watch status progression:
- Created → Job queued
- Running → Backup in progress (shows percentage)
- Completed → Backup successful
First Backup Timing:
- Full backup typically takes 1-3 hours depending on VM size
- Shows progress percentage throughout
- Backup size approximately equals VM disk usage
Verify Backup Completed:
- Navigate to Backup vaults → Default
- Click Recovery points tab
- Find your VM’s recovery point
- Verify:
- Status: Completed (green)
- Backup size: Reasonable for your VM
- Creation date: Today
Important: Incremental Backups
- First backup is always full snapshot
- Second and subsequent backups use Changed Block Tracking (CBT)
- Incremental backups are 90-95% smaller
- Complete in minutes instead of hours
- Automatic – no configuration needed
Test Restore
Initiate Test Restore:
- Navigate to Backup vaults → Default
- Click Recovery points tab
- Select your test VM’s recovery point
- Click Restore
Restore Configuration:
VMware Destination Settings:
- Target Hypervisor: Select your vCenter
- Resource Pool: Select appropriate pool
- Datastore: Select storage location
- VM Folder: Create
RestoredVMsfolder for test restores - Network: Map networks appropriately
VM Settings:
- VM Name:
TestVM-Restored-Validation - Power On: Yes (to immediately test functionality)
IAM Role: Select default role
- Click Restore
Monitor Restore:
- Navigate to Jobs → Restore jobs
- Watch status: Running → Completed
- Typical restore time: 30 minutes – 2 hours
Validate Restored VM:
In vSphere Client:
- Navigate to
RestoredVMsfolder - Verify VM exists:
TestVM-Restored-Validation - Confirm VM is powered on
- Open console and verify:
- Guest operating system boots normally
- All disks present and accessible
- Applications start correctly
- Data integrity is intact (compare sample files)
Document Recovery Metrics:
- Recovery Point Objective (RPO): Time difference between restore point and actual data
- Recovery Time Objective (RTO): Time from restore initiation to VM fully operational
- These metrics are critical for disaster recovery planning
Delete Test Restore:
- After validation, delete restored test VM
- Prevents confusion and saves storage
- Keep documented results for reference
Your organisation now has:
- Operational backup gateway connected to AWS
- VMware vCenter fully integrated
- Tag-based backup policies configured
- First full backup completed successfully
- Incremental backup capability verified
- Restore process tested and validated
Air-Gapped Vault with Compliance Locks
Compliance-Mode Locks
What is Compliance-Mode Lock:
- Makes backup vault permanently immutable
- Backups cannot be deleted before retention period expires
- Not even root account owner can bypass
- Not even AWS support can override
- Once grace period expires, lock is irreversible
During grace period you can:
- Test backup and restore operations
- Verify retention policies work correctly
- Delete vault if you change your mind (last chance)
After grace period expires:
- Lock becomes permanent
- No changes possible
- Vault exists until all backups expire naturally
**Warning**:
This is a point of no return decision. Before proceeding:
- Get approval from senior management
- Understand financial commitment (vault accumulates costs for entire retention period)
- Test thoroughly during grace period
- Document retention requirements clearly
Create Dedicated KMS Encryption Key
In AWS Key Management Service (KMS):
- Navigate to KMS service
- Select same region as backup vault (example: eu-west-2)
- Click Customer managed keys → Create key
Key Configuration:
Step 1 – Configure Key:
- Key Type: Symmetric
- Key Usage: Encrypt and decrypt
- Key Material Origin: KMS
- Regionality: Single-Region key
Step 2 – Add Labels:
- Alias:
backup-airgapped-vault-encryption - Description:
Encryption key for air-gapped backup vault - Production environment - Tags:
- Purpose: Backup-Encryption
- Environment: Production
- VaultType: AirGapped
Step 3 – Define Key Administrators:
- Select your IAM user or role as key administrator
- This allows you to manage key policies
- Key administrators cannot use key to encrypt/decrypt
Step 4 – Define Key Usage Permissions:
- Select: AWS Backup service (allows AWS Backup to use key)
- Select: Your backup administrator IAM role
- This grants permission to encrypt and decrypt backup data
Step 5 – Review and Create:
- Review all settings carefully
- Click Finish
Document Key Information:
- Copy Key ID (format: a1b2c3d4-…)
- Copy Key ARN (format: arn:aws:kms:eu-west-2:account:key/…)
- Store in secure location
- You’ll need this later for vault creation
Create Air-Gapped Backup Vault
In AWS Backup Console:
- Navigate to Backup vaults
- Click Create backup vault
- Important: Select Create logically air-gapped vault option
Vault Configuration:
Basic Information:
- Vault Name:
Production-AirGapped-Vault - Vault Type: Logically air-gapped vault
- Description:
Immutable backup vault for ransomware protection
Encryption:
- Select: Choose a custom encryption key
- Select the KMS key you created in Step 2.1
- Key alias:
backup-airgapped-vault-encryption
Retention Configuration:
- Minimum Retention Days:
30 - Maximum Retention Days:
365 - Adjust those based on your compliance requirements
Tags:
- Environment: Production
- Purpose: Ransomware-Protection
- ComplianceMode: True
- CreatedDate: (today’s date)
- Click Create vault
Document Vault ARN
After creation:
- Copy the full Vault ARN (format: arn:aws:backup:eu-west-2:account:backup-vault:Production-AirGapped-Vault)
- Print this ARN and store in physical safe
- Store digital copy in password manager
- You will need this ARN for disaster recovery
- Without this ARN, you cannot request access during emergency
Step 2.3: Apply Compliance-Mode Vault Lock
FINAL WARNING – READ CAREFULLY:
╔════════════════════════════════════════════════════════╗
║                  POINT OF NO RETURN                     ║
╠════════════════════════════════════════════════════════╣
║                                                        ║
║  You are about to enable COMPLIANCE MODE VAULT LOCK   ║
║                                                        ║
║  After grace period (default 3 days) expires:         ║
║  • Lock becomes PERMANENT and IMMUTABLE                ║
║  • Vault CANNOT be deleted by anyone                   ║
║  • Settings CANNOT be changed or modified              ║
║  • Even AWS support CANNOT bypass this lock            ║
║  • Vault exists until retention period expires         ║
║                                                        ║
║  Financial Commitment:                                 ║
║  • Estimated monthly cost: $325                        ║
║  • Commitment period: Retention period (365 days)      ║
║  • Cannot be canceled or refunded                      ║
║                                                        ║
║  Required Approvals:                                   ║
║  □ Management approval obtained                        ║
║  □ Backup/restore tested successfully                  ║
║  □ Retention requirements verified                     ║
║  □ Budget approval secured                             ║
║  □ Vault ARN documented offline                        ║
║  □ All implications understood                         ║
║                                                        ║
╚════════════════════════════════════════════════════════╝
If you have all approvals and understand implications:
In AWS Backup Console:
- Navigate to Backup vaults
- Select
Production-AirGapped-Vault - Click Actions → Configure vault lock
Vault Lock Configuration:
- Lock Mode: Compliance mode (recommended for ransomware protection)
- Minimum Retention Days:
30 - Maximum Retention Days:
365 - Grace Period:
3(72 hours to test)
- Review warning dialog carefully
- Type
confirmto acknowledge - Click Apply vault lock
Grace Period Begins:
- You now have 3 days to test thoroughly
- Mark calendar for when lock becomes permanent
- Use this time to validate restore operations
- Last chance to delete vault if needed
Update Backup Plan for Air-Gapped Copy
Modify Existing Backup Plan:
- Navigate to Backup plans
- Select
VMware-Production-Daily-Backup - Click Edit
- Find
DailyBackupRule - Click Edit rule
Add Copy Destination:
Scroll to Copy to destination section:
- Enable: Yes, copy backups to another vault
- Destination Vault: Select
Production-AirGapped-Vault
Lifecycle for Copied Backups:
- Transition to cold storage:
90 days - Expire:
365 days
Why Different Lifecycle:
- Primary vault: Short retention (90 days) for quick operational restores
- Air-gapped vault: Long retention (365 days) for ransomware recovery
- Cold storage after 90 days saves approximately 90% on storage costs
- Click Save changes
How Copy Jobs Work:
- Primary backup runs at scheduled time (3:00 AM) to Default vault
- After primary backup completes, copy job starts automatically
- Backup copied to air-gapped vault (typically 30 minutes – 2 hours)
- Both copies exist independently:
- Primary can be deleted after 90 days (operational use)
- Air-gapped copy protected for 365 days (ransomware protection)
- If primary corrupted, air-gapped copy remains safe
Monitor Copy Job Execution
Wait for Next Scheduled Backup or Trigger Manual Backup:
After next backup completes, copy job automatically starts.
Monitor Copy Jobs:
- Navigate to Jobs → Copy jobs
- Locate most recent copy job
- Watch status progression:
- Created: Job queued
- Running: Copy in progress (shows percentage)
- Completed: Copy successful
Typical Timeline:
- Source backup size: 500 GB
- Copy duration: 45-90 minutes
- Network: Internal AWS (no egress charges)
Verify Copy in Air-Gapped Vault:
- Navigate to Backup vaults
- Select
Production-AirGapped-Vault - Click Recovery points tab
- Verify:
- Recovery point from test VM exists
- Status: Completed
- Size: Matches primary backup
- Retention: 365 days
- Locked: Yes
Check Vault Statistics:
View vault summary:
- Number of recovery points: Should match expected backup count
- Total storage: Sum of all backup sizes
- Locked status: Yes (with grace period countdown or “Locked” if expired)
- Lock date: When lock becomes or became permanent
Test Restore from Air-Gapped Vault
Test during grace period while you can still delete vault if problems occur
Post-Lock Verification
After Grace Period Expires:
Verify Permanent Lock Status:
- Navigate to Backup vaults
- Select
Production-AirGapped-Vault - Verify vault details:
- Locked: Yes (no grace period remaining)
- Lock Mode: Compliance
- Lock Date: (date when lock became permanent)
- Immutable: True
Test Lock Protection (Should Fail – Proves It Works):
Attempt 1: Try to Delete Vault
- Select vault
- Click Actions → Delete
- Expected: Error message “Cannot delete vault – protected by compliance-mode lock”
- This proves protection is working correctly
Attempt 2: Try to Modify Lock Settings
- Select vault
- Click Actions → Configure vault lock
- Expected: All options greyed out / disabled
- This proves lock is truly immutable
Attempt 3: Try to Delete Individual Backup
- Select a recovery point
- Try to delete
- Expected: Deletion blocked by retention policy
- Backup can only be deleted after retention period expires naturally
Document Vault Lock Status:
Record in your documentation:
- Lock Status: Permanent / Immutable
- Lock Applied Date: [date]
- Earliest Possible Deletion: [date + 30 days minimum retention]
- Verified By: [your name]
- Next Review: [quarterly review date]
Your organisation now has:
- Dedicated KMS encryption key for air-gapped vault
- Logically air-gapped vault with compliance-mode lock
- Automated copy jobs from primary to air-gapped vault
- Tested restore capability from air-gapped vault
- Permanent immutable protection active
- Vault ARN documented in secure offline location
External Approval Team Configuration
Understanding External Approval Teams
Why External Account is Critical:
Vulnerable Setup (What NOT To Do):
Approval Team → Located in your AWS Organization
↓
Attacker compromises organization
↓
Attacker can compromise approval team
↓
Result: Backups accessible to attacker
Secure Setup (What We’re Building):
Approval Team → Separate AWS account (outside organization)
↓
Attacker compromises organization
↓
Approval team remains isolated and secure
↓
Result: Backups protected, attacker cannot approve access
Key Security Principle:
Even if ransomware attackers gain root access to every account in your organization, they cannot access air-gapped vault without approval from external team members who are outside the compromised environment.
Create External Approval Account
Create Completely Separate AWS Account:
Critical Requirements:
- Must be standalone AWS account
- Cannot be member of your AWS Organization
- Cannot be part of any organizational structure
- Managed by separate administrators
- Dedicated email address (not shared with production accounts)
Account Creation Process:
- Go to https://aws.amazon.com/
- Click Create an AWS Account
- Use dedicated email address
- Example:
[email protected] - Create new mailbox if needed (don’t reuse existing)
- Example:
- Account name:
Backup-Approval-Authority - Complete registration process
- Provide payment method (monthly cost will be ~$0)
Immediate Security Configuration:
1. Secure Root Account:
- Sign in as root user immediately
- Navigate to Security credentials
- Enable MFA using hardware token (strongly recommended) or authenticator app
- Create strong root password (20+ characters)
- Store credentials in password manager
- Record recovery codes securely
2. Set Account Alias:
- Navigate to IAM → Dashboard
- Create account alias:
backup-approval-authority - This creates friendly URL:
https://backup-approval-authority.signin.aws.amazon.com
3. Enable CloudTrail Logging:
- Navigate to CloudTrail service
- Create trail:
approval-team-audit-trail - Apply to all regions: Yes
- Log file validation: Enabled
- Create new S3 bucket for logs
- Enable log encryption (optional but recommended)
Why CloudTrail is Critical:
- Logs every approval action
- Provides complete audit trail
- Required for compliance
- Cannot be disabled (ransomware protection)
- Helps forensics if incident occurs
Enable IAM Identity Center
What is IAM Identity Center:
- Centralised user management for AWS
- Built-in MFA enforcement
- Required for approval team functionality
Enable Identity Center
Configure Multi-Factor Authentication:
- In IAM Identity Center, click Settings
- Navigate to Authentication tab
- Under Multi-factor authentication section:
- Enable MFA: Yes
- Prompt users for MFA: Every time (most secure)
- Allow these MFA types:
- Authenticator apps (Google Authenticator, Authy, 1Password)
- Security keys (YubiKey, other FIDO2 devices)
- Built-in authenticators
- Click Save changes
Configure Password Policy:
Still in Settings → Authentication:
Password requirements:
- Minimum length: 14 characters
- Require uppercase letters: Yes
- Require lowercase letters: Yes
- Require numbers: Yes
- Require symbols: Yes
- Password expiration: 90 days
- Prevent password reuse: Last 24 passwords
- Account lockout: 5 failed attempts
- Lockout duration: 15 minutes
Configure Session Duration:
In Settings:
- Session duration: 8 hours
- Idle timeout: 1 hour
- This balances security with usability
Create Approval Team Members
Identify Trusted Approvers:
Selection Criteria:
- Senior executive level (C-suite)
- Technical understanding of disaster recovery
- Authority to approve emergency actions
- Available 24/7 for emergency response
- Trusted with company-critical decisions
- Ideally not IT administrators (separation of duties)
Example Approval Team Composition:
Approver 1: Chief Technology Officer (CTO)
- Role: Technical authority and infrastructure oversight
- Responsibility: Verify technical legitimacy of requests
Approver 2: Chief Information Security Officer (CISO)
- Role: Security authority and incident response
- Responsibility: Verify security implications and threats
Approver 3: Chief Financial Officer (CFO) or IT Manager
- Role: Business continuity and operational authority
- Responsibility: Authorize business impact decisions
Create Users in IAM Identity Center:
- In IAM Identity Center, navigate to Users
- Click Add user
For Each Approver, Configure:
User Details:
- Username: (first.last format, example: john.smith)
- Email address: (work email, must be valid and monitored)
- First name: (example: John)
- Last name: (example: Smith)
- Display name: (example: John Smith)
Optional but Recommended:
- Job title: (example: Chief Technology Officer)
- Department: (example: C- Leadership)
- Phone number: (for verification)
- Click Next
- Skip group assignment (for now)
- Click Next
- Review details
- Click Add user
Repeat for all approval team members (minimum 3 recommended)
Users Receive Setup Emails:
Each user receives invitation email:
Subject: Set up your AWS IAM Identity Center account

You've been invited to join the Backup-Approval-Authority
AWS account.

Click here to complete setup: [Link expires in 7 days]

Setup Requirements:
1. Create password (minimum 14 characters)
2. Configure MFA device (required)
3. Save recovery codes
4. Complete profile

Important: Complete setup within 7 days or invitation expires.
User Setup Process
Each Approval Team Member Must Complete:
Step 1: Create Password
- Click invitation link received via email
- Create strong password meeting requirements:
- Minimum 14 characters
- Mix of uppercase, lowercase, numbers, symbols
- Example:
MySecure$Backup#Approval#2025!
- Confirm password
- Click Continue
Step 2: Register MFA Device
Choose MFA device type:
- Recommended: Authenticator app (Google Authenticator, 1Password)
- Alternative: Hardware security key (YubiKey or similar)
For Authenticator App:
- Open authenticator app on smartphone
- Select Add account or scan QR code option
- Scan QR code displayed in AWS console
- App generates 6-digit codes every 30 seconds
- Enter two consecutive codes to verify
- Click Assign MFA device
Important MFA Setup Notes:
- Save backup codes in secure location
- Test MFA before closing setup
- If smartphone lost, recovery codes allow access
Step 3: Complete User Profile
- Verify display name is correct
- Verify email address
- Add phone number (used for out-of-band verification)
- Review profile details
- Click Complete setup
Step 4: Test Initial Sign-In
- Sign out from setup session
- Navigate to:
https://backup-approval-authority.signin.aws.amazon.com - Enter username
- Enter password
- Enter current MFA code from authenticator app
- Should successfully sign in and see approval portal
Enable Multi-Party Approval in Backup Account
Switch Context to Production Backup Account:
Now configure your production backup account to accept external approval teams.
In Production Backup Account:
- Sign in to backup administrator account
- Select your backup region (example: eu-west-2)
- Navigate to AWS Backup service
- Click Settings in left navigation menu
Enable Required Features:
Enable all three cross-account features:
- Cross-Account Backup: Enable
- Cross-Account Monitoring: Enable
- Multi-Party Approval: Enable
What These Settings Enable:
- Cross-Account Backup: Allows backup sharing between AWS accounts
- Cross-Account Monitoring: View backup status across multiple accounts
- Multi-Party Approval: Required for external approval team integration
- Click Save changes
Verification:
- All three settings should show “Enabled” status
- Green checkmarks next to each feature
- If any setting fails to enable, check IAM permissions
Create Approval Team
Return to External Approval Account:
In External Approval Account (us-east-1 region):
- Navigate to AWS Backup service
- Click Approval teams in left menu
- Click Create approval team
Approval Team Configuration:
Team Details:
- Team Name:
Production-Recovery-Team - Description:
External approval team for emergency backup access.
Add Team Members:
For each IAM Identity Center user created earlier:
Member 1:
- User: Select first user from dropdown
- Email: (auto-populated from Identity Center)
- Role: Approver
Member 2:
- User: Select second user
- Email: (auto-populated)
- Role: Approver
Member 3:
- User: Select third user
- Email: (auto-populated)
- Role: Approver
Approval Threshold:
- Minimum approvals required:
2 - This means 2 out of 3 members must approve any access request
- Prevents single point of failure
- Balances security with availability (if 1 member unavailable, can still proceed)
Tags for Organization:
- Purpose: Emergency-Recovery
- Organisation: External-Authority
- CriticalityLevel: High
- Environment: Production
- Click Create approval team
***Document Approval Team ARN***
After creation:
- Copy Approval Team ARN (format: arn:aws:backup:us-east-1:account:approval-team/Production-Recovery-Team)
- Store in password manager
- You will need this ARN for disaster recovery
- Without this ARN, cannot request or grant access during emergency
Team Activation Process
Automatic Invitation Emails Sent:
Immediately after approval team creation, each member receives:
From: AWS Backup Multi-Party Approval
Subject: [ACTION REQUIRED] Join Approval Team: Production-Recovery-Team

You've been invited to join an approval team for emergency
backup access.

Team: Production-Recovery-Team
Your Role: Approver
Approval Threshold: 2 of 3 members must approve

CRITICAL REQUIREMENTS:
• ALL team members must accept within 24 hours
• If ANY member declines, team becomes inactive
• MFA is REQUIRED (already configured during setup)
• You must be available 24/7 for emergency approvals

To Accept Invitation:
1. Click invitation link: [Link expires in 24 hours]
2. Sign in with IAM Identity Center credentials
3. Complete MFA verification
4. Review team details
5. Accept membership

Approval Portal: https://backup-approvals.aws.amazon.com/

Questions? Contact your security team immediately.
Each Team Member Must:
- Click invitation link (within 24 hours)
- Sign in to IAM Identity Center:
- Username: (their username)
- Password: (their password)
- MFA Code: (6-digit code from authenticator app)
- Review approval team invitation details:
- Team name: Production-Recovery-Team
- Team purpose: Emergency backup access approval
- Minimum approvals: 2 of 3
- Responsibilities: 24/7 availability, out-of-band verification
- Click Accept invitation
- Confirm understanding of role and responsibilities
Test Approval Portal Access
Each Member Should Independently Test:
Access Approval Portal:
- Navigate to:
https://backup-approvals.aws.amazon.com/ - Sign in with IAM Identity Center credentials
- Complete MFA verification
- Should see: Approval Portal Dashboard
Document Portal Access:
Record in documentation:
- Portal URL: https://backup-approvals.aws.amazon.com/
- All 3 members tested access successfully: Yes
- Date tested: [today’s date]
- Next access test: [quarterly drill date]
Your organisation now has:
- External approval account (completely separate from production organization)
- IAM Identity Center configured with strong MFA enforcement
- Three trusted approval team members with active accounts and MFA
- Approval team created and fully activated
- All members can access approval portal
- Approval team ARN documented in secure offline location
Cross-Account Integration
Cross-Account Resource Sharing
AWS Resource Access Manager (RAM)
- AWS service for secure resource sharing between accounts
- Works across AWS Organizations and external accounts
- Provides audited, secure sharing
- Required for external approval team integration
The Integration Flow:
External Approval Account (has approval team)
↓
[Share via AWS RAM]
↓
Production Backup Account (has air-gapped vault)
↓
[Associate approval team with vault]
↓
Vault requires approval team authorization for access
Share Approval Team via AWS RAM
In External Approval Account:
- Sign in to external approval account
- Navigate to AWS Resource Access Manager (RAM) service
Create Resource Share:
- Click Create resource share
Step 1 – Resource Share Details:
- Name:
Backup-Approval-Team-Share - Description:
Shares Production-Recovery-Team with production backup account for emergency vault access authorization
Step 2 – Select Resources to Share:
- Resource type: Select Backup: Approval Team
- Select resources: Check
Production-Recovery-Team - This is the approval team created in Phase 3
Step 3 – Grant Access to Principals:
Critical Setting:
- Principal type: Select AWS account
- Enter AWS account ID: (your production backup account ID)
- Allow external principals: ✓ CHECK THIS BOX
- This is critical for cross-organization sharing
- Without this, sharing will fail
- Required because approval account is outside your organization
Step 4 – Add Tags:
- Purpose: Emergency-Recovery-Authorisation
- TargetAccount: (backup account ID)
- SecurityLevel: Critical
- SharedResource: ApprovalTeam
- Review all settings
- Click Create resource share
Resource Share Status:
- Status: Pending (waiting for acceptance by backup account)
- Share ARN: (document this for reference)
- Shared resources: 1 (approval team)
- Principals: 1 (backup account)
Accept Resource Share in Backup Account
Switch to Production Backup Account:
- Sign in to production backup account
- Region: eu-west-2 (or your backup region)
- Navigate to AWS Resource Access Manager (RAM)
View Pending Invitations:
- Click Shared with me in left navigation
- Click Resource shares tab
- You should see:
- Resource share name:
Backup-Approval-Team-Share - Status: Pending
- Shared from: (external approval account ID)
- Resources: 1 Backup approval team
- Received: (timestamp)
- Resource share name:
Accept the Resource Share:
- Select the resource share
- Click Accept resource share button
- Confirmation dialog appears
- Read the confirmation message
- Click Accept
Verification After Acceptance:
- Status changes from Pending to Active
- Resource share now appears under “Accepted” section
- Shared resources become available to use
Verify Approval Team Accessibility
In Production Backup Account:
- Navigate to AWS Backup service
- Region: eu-west-2 (your backup region)
- Click Approval teams in left navigation menu
You Should Now See:
Approval Teams

Name: Production-Recovery-Team
Shared From: [External Account ID]
Status: Active
Members: 3
Minimum Approvals: 2 of 3
Type: External (Cross-Account)
This Confirms:
- Cross-account sharing successful
- Approval team accessible from production account
- Ready to be assigned to air-gapped vault
- External approval team will protect your backups
If Approval Team Doesn’t Appear:
- Verify resource share was accepted (check AWS RAM)
- Confirm you’re in correct region (eu-west-2 or your backup region)
- Wait 2-3 minutes for propagation
- Check AWS Service Health Dashboard for any issues
Create and Apply Vault Access Policy
Purpose: Configure vault to require external approval for all restore operations.
In AWS Backup Console:
- Navigate to Backup vaults
- Select
Production-AirGapped-Vault - Click Access policy tab
- Click Edit policy
Select Policy Builder Option:
Create policy with three statements:
Statement 1 – Allow Backup Operations:
- Effect: Allow
- Principal: Service →
backup.amazonaws.com - Actions:
backup:CopyIntoBackupVault(allows copy jobs)
- Resources:
*(all) - Conditions: None
Statement 2 – Require Approval for Restore:
- Effect: Allow
- Principal:
*(anyone) - Actions:
backup:StartRestoreJob(restore operations)backup:GetRecoveryPointRestoreMetadata(restore metadata)
- Resources:
*(all) - Condition (Critical):
- Condition key:
backup:ApprovalTeamArn - Operator: String equals
- Value: (paste your approval team ARN from Phase 3)
- Condition key:
Statement 3 – Deny Dangerous Operations:
- Effect: Deny
- Principal:
*(anyone, including root) - Actions:
backup:DeleteRecoveryPoint(prevent backup deletion)backup:DeleteBackupVault(prevent vault deletion)backup:PutBackupVaultAccessPolicy(prevent policy modification)
- Resources:
*(all) - Conditions: None
- Review all three statements
- Click Save policy
What This Policy Enforces:
✓ Allows: AWS Backup service to copy backups into vault (normal operations) ✓ Requires: External approval team approval for any restore operation ✗ Denies: Anyone (including root) from deleting backups or vault ✗ Denies: Anyone from modifying this vault access policy (prevents tampering)
Policy Protection:
Once applied, this policy cannot be modified without:
- Deleting and recreating vault (impossible due to compliance lock)
- Or having specific IAM permissions (which should be tightly controlled)
Associate Approval Team with Vault
In Vault Configuration:
- While viewing
Production-AirGapped-Vault - Click Approval team tab
- Click Assign approval team
Association Settings:
- Select approval team:
Production-Recovery-Team(from external account) - Review association notice:
- “This approval team is from an external account”
- “All vault access will require approval from this team”
- “Minimum 2 of 3 approvals required”
- Confirm you understand implications
- Click Assign approval team
Confirmation After Assignment:
You should see:
Approval Team Assignment

Team Name: Production-Recovery-Team
Team ARN: arn:aws:backup:us-east-1:[EXTERNAL-ACCOUNT]:approval-team/...
Status: Assigned
Shared From: [External Account ID]
Members: 3
Minimum Approvals: 2 of 3
Type: External (Cross-Organization)
Assignment Date: [Today's Date]
Document Complete Configuration:
Record all details in secure documentation:
Production Air-Gapped Vault - Complete Configuration
═══════════════════════════════════════════════════

Vault Information:
─────────────────
Name: Production-AirGapped-Vault
ARN: arn:aws:backup:eu-west-2:[BACKUP-ACCOUNT]:backup-vault:Production-AirGapped-Vault
Region: eu-west-2
Account: [Backup Account ID]

Security Configuration:
──────────────────────
Compliance Lock: Active (Permanent)
Lock Date: [Date]
Minimum Retention: 30 days
Maximum Retention: 365 days
Encryption: Custom KMS Key

Approval Team:
─────────────
Name: Production-Recovery-Team
ARN: arn:aws:backup:us-east-1:[EXTERNAL-ACCOUNT]:approval-team/Production-Recovery-Team
Location: External Account (Outside Organization)
Account: [External Approval Account ID]

Team Members:
────────────
1. [Name] ([Title]) - [Email] - [Phone]
2. [Name] ([Title]) - [Email] - [Phone]
3. [Name] ([Title]) - [Email] - [Phone]

Approval Requirements:
─────────────────────
Minimum Approvals: 2 of 3
MFA Required: Yes (all members)
Out-of-Band Verification: Required before approval

Access Details:
──────────────
Approval Portal: https://backup-approvals.aws.amazon.com/
Emergency Contact Card: [Physical Location]
Vault ARN Document: [Physical Safe Location]

Integration Status:
──────────────────
RAM Resource Share: Active
Approval Team Assignment: Complete
Access Policy: Applied and Enforced
Testing: Completed Successfully

Verification:
────────────
Configuration Date: [Date]
Verified By: [Your Name]
Next Review: [Quarterly Review Date]
Last Tested: [DR Drill Date]
Your organisation now has:
- Approval team shared from external account via AWS RAM
- Production backup account accepted and integrated shared team
- Air-gapped vault configured with comprehensive access policy
- Policy enforces multi-party approval requirement from external team
- Approval team assigned to vault
- Integration verified through comprehensive testing
- Complete configuration documented
Your backups are now protected by multiple security layers:
- Immutable compliance-mode locks (cannot be deleted by anyone)
- Logical air-gapping (isolated from your production environment)
- External approval authority (outside your organisation)
- Multi-party approval requirement (2+ trusted individuals)
- MFA enforcement (all approvers)
- Complete CloudTrail audit trail
Even if ransomware attackers compromise your entire AWS organisation with root access, they can’t access or delete your immutable backups without approval from external team members who are completely outside the compromised environment.
Conclusion
You have now successfully implemented enterprise-grade ransomware protection.
Your organisation is now protected against:
- Ransomware attacks targeting backups
- Insider threats attempting backup deletion
- Administrative account compromise
- Organisational-level security breaches
- Accidental deletion of critical backups
This implementation guide is designed to be used by any organisation implementing AWS Backup for VMware with air-gapped vaults and external approval teams. All examples should be adapted to your specific environment, account IDs, and organisational requirements.