I recently had to build this for a customer. Most of their servers were VMware VMs running on-premises. They had plans to move a number of those servers to AWS over time, but were also going to keep a large on-premises footprint for the foreseeable future, so a hybrid setup was going to be their reality for years to come.
Their main concern was ransomware, specifically, what happens if an attacker gets in and goes after the backups. It’s a valid concern. Most ransomware attacks now target backups before anything else, because if the backups are gone, the victim has no choice but to pay.
They already had a third-party backup solution in place for their on-premises VMs, but they wanted an extra layer of protection in AWS, something offsite and completely separate from their own infrastructure. The concern was that if ransomware hit their data centre, it could take out both production and the local backups at the same time. Having backups in AWS meant they’d have a copy that was physically elsewhere and, more importantly, one that couldn’t be touched even if an attacker got into their AWS accounts.
What they needed was a setup where those AWS backups were completely untouchable, not just hard to reach, but impossible to delete even with full admin access. That meant immutable storage with compliance-mode locks, a vault isolated from the rest of the organisation, and an approval team sitting in a completely separate AWS account that has nothing to do with their organisation.
Having successfully built and tested this for the customer, I can say it delivers exactly what it promises: backups that survive a full infrastructure compromise, with a clear recovery path when you need it most.
This guide shows you how to build enterprise-grade ransomware protection for VMware workloads using AWS Backup, combining immutable storage, logically air-gapped vaults, and an external multi-party approval authority so that even a full administrative compromise cannot destroy your backups.
1. Why Traditional Backups Fail Against Ransomware
Modern ransomware gangs don’t just encrypt production data, they specifically target backups first. The typical attack pattern looks like this:
- Attacker gains initial access to production systems
- Privilege escalation to administrator level (often within hours)
- Backups deleted or encrypted — this is the kill shot
- Production data encrypted
- Ransom demanded, with victims having no recovery path
The root problem is that most backup solutions are protected by the same credentials and accounts as production. If an attacker owns your admin accounts, they own your backups too.
This guide solves that problem using three security layers that operate independently of your production environment:
| Layer | Mechanism | What It Prevents |
|---|---|---|
| Immutable Storage | Compliance-mode vault lock | Deletion by anyone — including root |
| Logical Air-Gap | Isolated vault with restrictive IAM | Direct access from compromised accounts |
| External Approval Authority | Separate AWS account + MFA | Approvals from inside a compromised organisation |
2. Architecture Overview
Security Model
┌─────────────────────────────────┐
│     PRODUCTION ENVIRONMENT      │
│  AWS Accounts + VMware on-prem  │
│  Daily automated backups (CBT)  │
│  Standard vault: vm restore     │
└──────────────┬──────────────────┘
               │ copy job
               ▼
┌─────────────────────────────────┐
│    AIR-GAPPED BACKUP VAULT      │
│  Compliance-mode lock           │
│  Custom KMS encryption key      │
│  365-day retention              │
│  Requires external approval     │
└──────────────┬──────────────────┘
               │ approval required
               ▼
┌─────────────────────────────────┐
│  EXTERNAL APPROVAL AUTHORITY    │
│  Completely separate AWS account│
│  Outside your organisation      │
│  3 senior executives + MFA      │
│  2-of-3 approval threshold      │
└─────────────────────────────────┘
How This Architecture Stops Ransomware
| Attack Step | What Happens |
|---|---|
| Attacker gains admin access | Production systems compromised |
| Attacker tries to delete backups | Blocked — compliance-mode lock prevents deletion by anyone |
| Attacker tries to access vault | Blocked — air-gap isolates vault from production accounts |
| Attacker tries to approve their own access | Blocked — approval team is in a separate organisation the attacker cannot reach |
| Result | Backups intact; organisation recovers without paying ransom |
3. Estimated Costs
Before committing to a compliance-mode vault lock (which is irreversible), understand the full cost picture.
| Component | Estimated Monthly Cost | Notes |
|---|---|---|
| Air-gapped vault storage (warm) | ~£200–£280 | Depends on backup size; ~500 GB example |
| Cold storage transition (after 90 days) | ~£20–£40 | ~90% saving vs warm |
| Backup gateway VM (EC2-equivalent on-premises) | £0 | Runs on your VMware host |
| KMS custom key | ~£0.80 | Per key per month |
| CloudTrail logging (approval account) | ~£1–£5 | S3 + API calls |
| AWS RAM (resource sharing) | £0 | No charge for RAM itself |
| Data transfer (intra-AWS copy jobs) | £0 | No egress for cross-account copies in same region |
| Estimated total | ~£220–£325/month | For ~500 GB of daily VMware backups |
Important: The compliance-mode vault lock represents a financial commitment for the full retention period (up to 365 days). Budget approval should be obtained before applying the lock. Costs scale linearly with backup data volume.
4. Prerequisites
Production Environment
AWS Infrastructure:
- AWS Organisations with a minimum of 2 accounts
- One account designated as backup delegate administrator
- Site-to-Site VPN between on-premises data centre and AWS (or internet connectivity from VMware environment)
VMware Environment:
- VMware vSphere 6.7 or later
- vCenter Server operational
- Service account with backup permissions
- Available resources: 4 vCPUs, 8 GB RAM, 80 GB disk for the gateway VM
Network Requirements:
- VPN bandwidth: 100 Mbps minimum (1 Gbps recommended)
- Latency: Under 50 ms recommended
- Firewall: HTTPS (port 443) outbound to AWS endpoints
- DNS resolution for AWS service endpoints
External Approval Account
New AWS Account (standalone — not part of your organisation):
- Dedicated email address (e.g.
[email protected]) - Root account secured with hardware MFA token
- Monthly cost: effectively £0
Trusted Approvers (minimum 3):
- Senior executives (CTO, CISO, CFO, or equivalent)
- Available 24/7 for emergency response
- Ideally not your day-to-day IT administrators (separation of duties)
5. Phase 1 — VMware Backup Gateway Setup
1.1 Configure AWS Organisations Delegation
Designate your backup account as central backup administrator for the entire organisation.
- Sign in to your AWS Organisations management account
- Navigate to AWS Organizations → Services → AWS service access
- Enable access for the AWS Backup service
- Navigate to Delegated administrators
- Register your backup account as delegated administrator for AWS Backup
- Verify delegation status shows as Active
1.2 Download and Deploy the Backup Gateway
The backup gateway is a virtual appliance that connects AWS Backup to your VMware environment.
In AWS Backup Console (Backup Account):
- Select your region (e.g.
eu-west-2for London) - Navigate to AWS Backup → External resources → Gateways
- Click Create gateway
- Download the OVF template (~1.2 GB), save as
aws-appliance-latest.ova
In VMware vSphere Client:
- Right-click a parent object (data centre or cluster)
- Select Deploy OVF Template → Local file
- Select the downloaded OVA
- Gateway name:
Backup-Gateway-Production - Select compute resource
- Critical: Storage disk format → Thick Provision Lazy Zeroed
- Select management network (must have internet access)
Before powering on, verify VM settings:
- CPU: 4 vCPUs
- Memory: 8 GB (set reservation to 8,192 MB)
- Hard disk: 80 GB
- VMware Tools → Enable time synchronisation with host
1.3 Configure Gateway Network Settings
- Power on the gateway VM and open the console
- Default credentials:
admin/password(you will be forced to change immediately) - Select Configure Network → Static IP and enter:
- IP Address, Subnet Mask, Default Gateway, Primary DNS, Secondary DNS
- Select Test Network Connectivity — all checks should show OK
Firewall rules required (outbound only):
*.backup.YOUR-REGION.amazonaws.com   → TCP 443
*.s3.YOUR-REGION.amazonaws.com       → TCP 443
time.aws.com                         → UDP 123
No inbound rules are required.
1.4 Register Gateway with AWS
- Navigate to External resources → Gateways → Register gateway
- Enter the gateway IP address, name (
Production-VMware-Gateway), and timezone - Wait 2–5 minutes for status to change to Connected
1.5 Integrate VMware vCenter
Create a vCenter service account with these permissions:
| Permission Category | Required Operations |
|---|---|
| Virtual Machine | All inventory, configuration, state, and provisioning |
| Datastore | Browse datastore, allocate space |
| Network | Assign network |
| Scope | Datacenter or cluster level, propagate to children |
Add hypervisor in AWS Backup:
- Navigate to External resources → Hypervisors → Add hypervisor
- Select your registered gateway
- Hypervisor Type: VMware vCenter
- Enter vCenter IP/hostname, port 443, and service account credentials
- Click Test Connection, then Add hypervisor
- Allow 5–10 minutes for automatic VM discovery
1.6 Create VMware Tags for Backup Selection
In vSphere Client → Tags & Custom Attributes → Tags, create a tag category:
- Category name:
backup - Cardinality: Single value per object
Create the following tags:
| Tag | Target VMs |
|---|---|
daily | Production databases, critical applications |
weekly | Development servers, secondary systems |
monthly | Archive or compliance-only systems |
none | Temporary or easily recreated VMs |
Apply tags by right-clicking each VM → Tags & Custom Attributes → Assign Tag.
1.7 Create Backup Plan
- Navigate to Backup plans → Create backup plan → Build a new plan
- Plan name:
VMware-Production-Daily-Backup
Backup rule configuration:
| Setting | Value |
|---|---|
| Rule name | DailyBackupRule |
| Backup vault | Default (temporary; updated in Phase 2) |
| Schedule | Daily, 03:00 AM local time |
| Backup window | Start within 1 hour, complete within 3 hours |
| Transition to cold storage | 30 days |
| Expire | 90 days |
Backup selection:
- Selection name:
Tagged-VMs-Daily-Production - Resource type:
VM - Tag filter: Key
backup, Valuedaily
1.8 Execute and Validate First Backup
Trigger a manual backup for testing:
- Navigate to Protected resources, select a non-production test VM
- Click Create on-demand backup → Default vault
- Monitor at Jobs → Backup jobs
First backup timing:
- First run: full snapshot (1–3 hours depending on VM size)
- Subsequent runs: incremental via Changed Block Tracking (CBT), typically minutes
Test restore:
- Navigate to Backup vaults → Default → Recovery points
- Select your recovery point → Restore
- Restore destination: a
RestoredVMsfolder in vSphere - Validate OS boot, disk accessibility, and application functionality
- Document your RPO and RTO metrics
- Delete the test VM after validation
6. Phase 2 — Air-Gapped Vault with Compliance Locks
Understanding Compliance-Mode Lock
Compliance-mode lock makes a backup vault permanently immutable. No one — not your root account, not AWS Support — can delete backups before the retention period expires. Once the grace period ends, the lock is irreversible.
During the grace period you can:
- Test backup and restore operations
- Verify retention policies
- Delete the vault if you change your mind
After the grace period expires:
- Lock is permanent — no exceptions
- Vault exists until all backups expire naturally
2.1 Create a Dedicated KMS Encryption Key
- Navigate to KMS → Customer managed keys → Create key
- Key type: Symmetric / Encrypt and decrypt / Single-region
- Alias:
backup-airgapped-vault-encryption - Key administrators: your backup administrator IAM user/role
- Key usage: AWS Backup service + your backup administrator IAM role
- Document the Key ARN — you will need it during vault creation
2.2 Create the Air-Gapped Backup Vault
- Navigate to Backup vaults → Create backup vault
- Select Create logically air-gapped vault
| Setting | Value |
|---|---|
| Vault name | Production-AirGapped-Vault |
| Encryption | Your custom KMS key |
| Minimum retention | 30 days |
| Maximum retention | 365 days |
After creation, copy and store the Vault ARN in a physical safe as well as a password manager. Without it, you cannot request emergency access during an incident.
2.3 Apply Compliance-Mode Vault Lock
POINT OF NO RETURN — READ BEFORE PROCEEDING
After the grace period (72 hours), this action becomes permanent and irreversible. Even AWS Support cannot undo it.
Required approvals before proceeding:
- [ ] Senior management sign-off obtained
- [ ] Backup and restore tested successfully
- [ ] Retention requirements confirmed with legal/compliance
- [ ] Monthly budget (~£220–£325) approved
- [ ] Vault ARN stored offline
- [ ] Grace period test plan ready (see checklist below)
In AWS Backup Console:
- Navigate to Backup vaults → Production-AirGapped-Vault
- Click Actions → Configure vault lock
- Lock mode: Compliance mode
- Minimum retention:
30days - Maximum retention:
365days - Grace period:
3(72 hours) - Type
confirmand click Apply vault lock
Grace period testing checklist (complete within 72 hours):
- [ ] Trigger a manual backup to the air-gapped vault
- [ ] Verify the copy job completes successfully
- [ ] Perform a test restore from the air-gapped vault
- [ ] Confirm vault lock status shows as Active (grace period)
- [ ] Attempt to delete a recovery point — confirm it is blocked
- [ ] Verify vault ARN is documented offline
- [ ] Confirm all approval team members can access the approval portal
2.4 Update Backup Plan for Air-Gapped Copy
- Navigate to Backup plans → VMware-Production-Daily-Backup → Edit
- Edit
DailyBackupRule→ scroll to Copy to destination - Enable copy, select
Production-AirGapped-Vault - Lifecycle for copied backups: transition to cold at 90 days, expire at 365 days
Why different lifecycles:
| Vault | Retention | Purpose |
|---|---|---|
| Default (primary) | 90 days | Fast operational restores |
| Air-gapped | 365 days | Ransomware recovery, cold after 90 days (90% cost saving) |
Copy job flow:
- Primary backup runs at 03:00 AM → Default vault
- Copy job starts automatically upon completion
- Backup copied to air-gapped vault (typically 30–90 minutes)
- Both copies exist independently — if primary is corrupted, air-gapped copy is unaffected
2.5 Post-Lock Verification
After the grace period expires:
- Navigate to vault details and confirm: Locked = Yes, Mode = Compliance, Grace period = None
- Attempt to delete the vault → expect an error (proves protection is working)
- Attempt to modify lock settings → expect all options to be disabled
- Attempt to delete a recovery point → expect deletion to be blocked
Record the lock date, verified-by name, and next quarterly review date in your documentation.
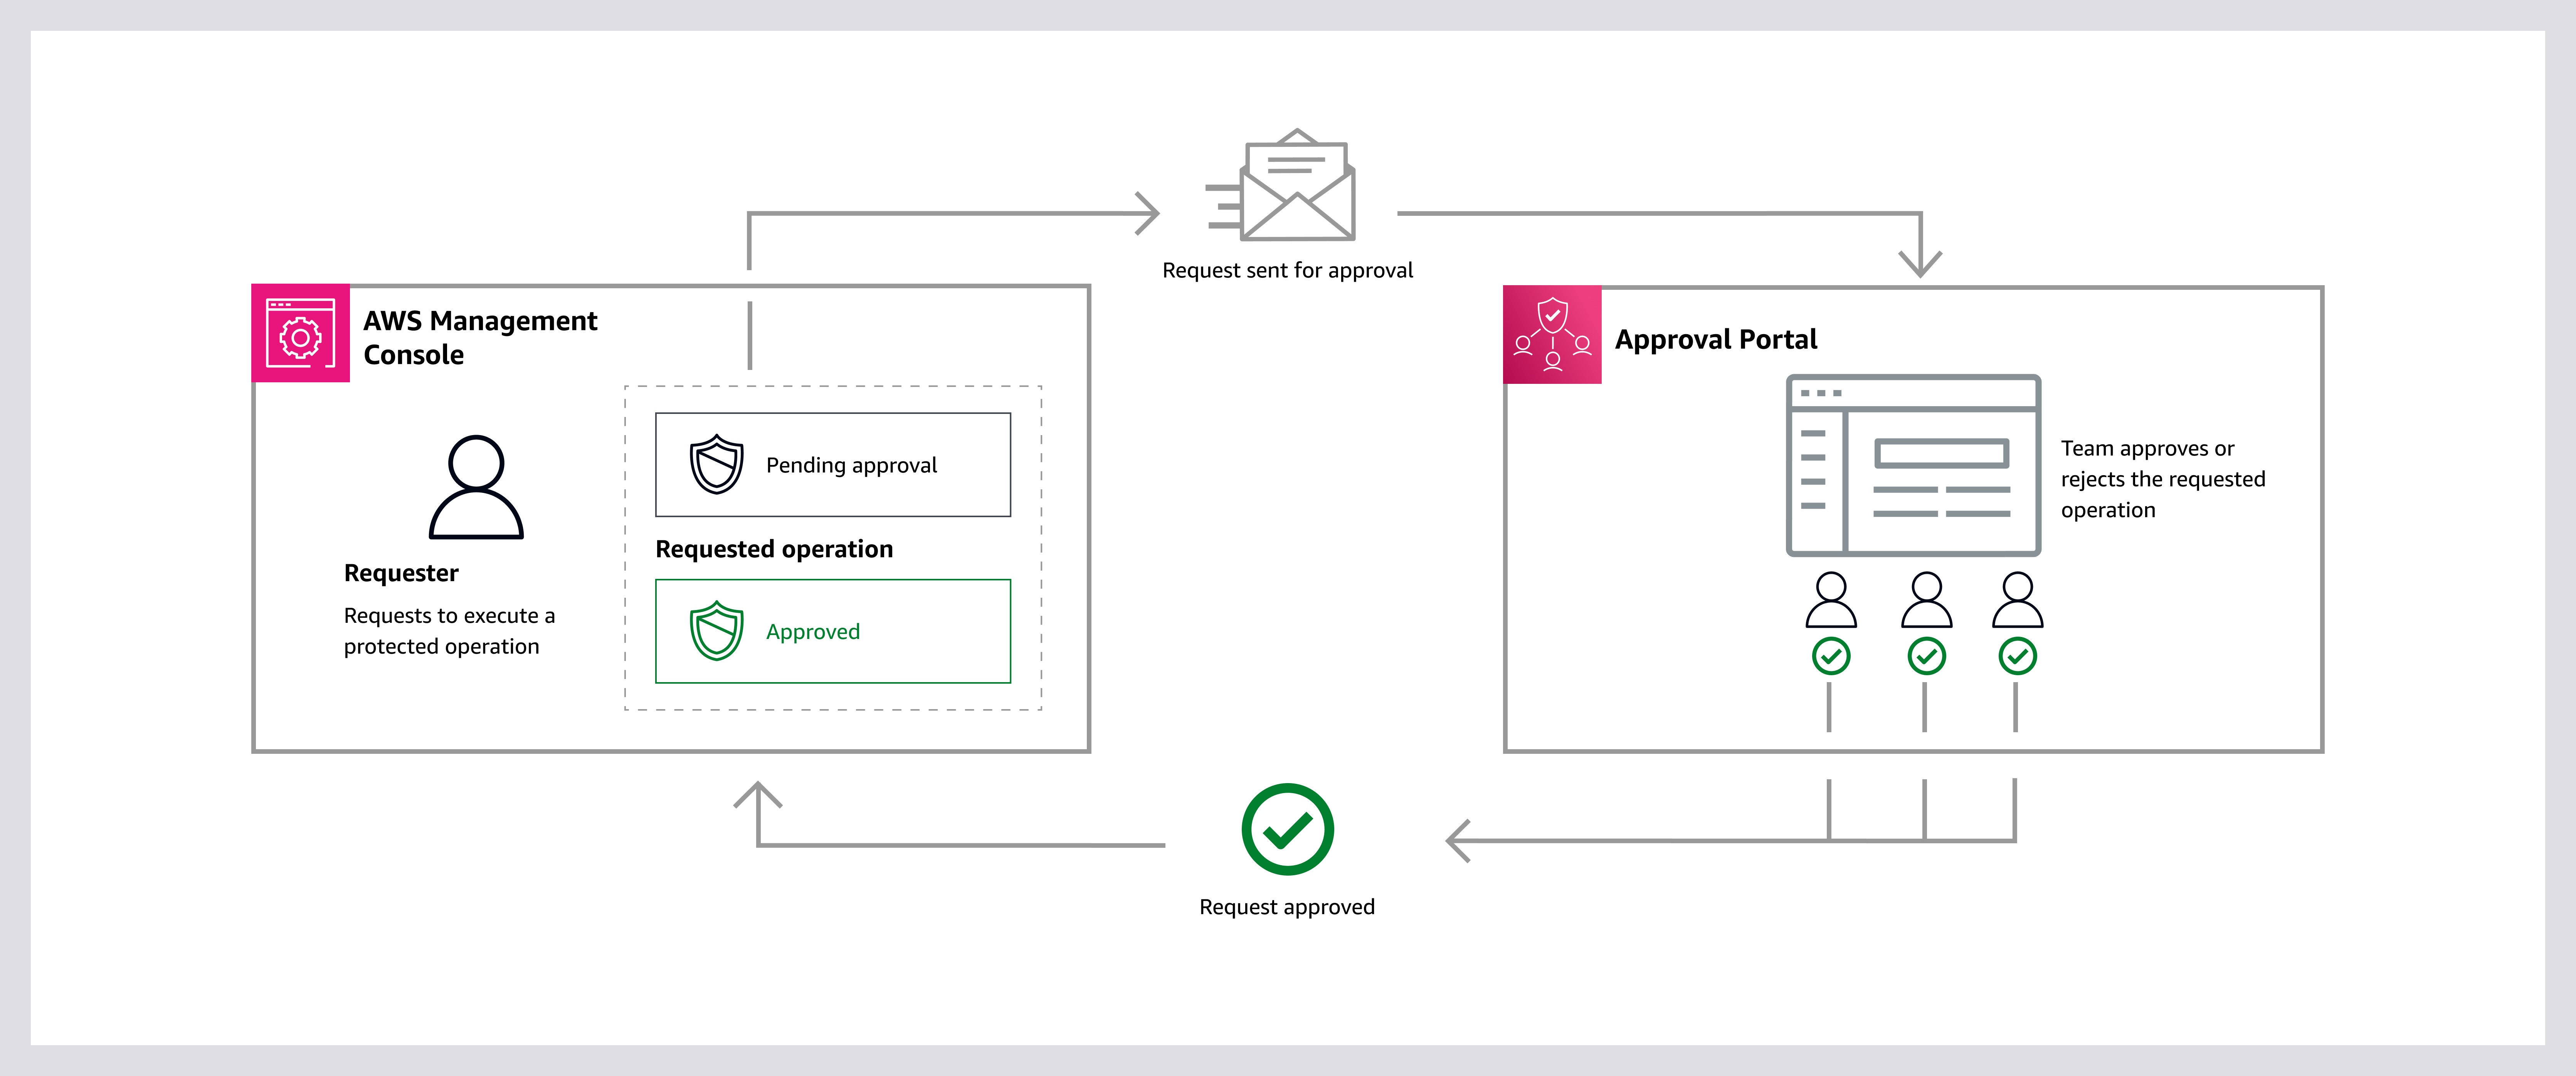
7. Phase 3 — External Approval Team Configuration
Why an External Account Is Critical
VULNERABLE SETUP
Approval team inside your AWS Organisation
→ Attacker compromises organisation
→ Attacker can compromise approval team
→ Backups accessible to attacker

SECURE SETUP
Approval team in a completely separate AWS account
→ Attacker compromises organisation
→ Approval team remains isolated
→ Backups protected
7.1 Create the External Approval Account
- Create a brand-new AWS account at aws.amazon.com
- Use a dedicated email address not shared with any production account
- Account name:
Backup-Approval-Authority - Immediately enable hardware MFA on the root account
- Set account alias:
backup-approval-authority
Enable CloudTrail immediately:
- Trail name:
approval-team-audit-trail - Apply to all regions: Yes
- Log file validation: Enabled
- S3 bucket: new dedicated bucket
- Log encryption: recommended
CloudTrail provides an immutable audit trail of every approval action and is essential for compliance and forensic investigation.
7.2 Enable IAM Identity Centre
Enable IAM Identity Centre in the external approval account, then configure:
MFA policy:
- Prompt for MFA: Every time
- Allowed types: Authenticator apps, FIDO2/hardware security keys, built-in authenticators
Password policy:
| Requirement | Value |
|---|---|
| Minimum length | 14 characters |
| Complexity | Uppercase, lowercase, numbers, symbols |
| Expiration | 90 days |
| Reuse prevention | Last 24 passwords |
| Lockout | 5 failed attempts / 15-minute lockout |
Session policy:
- Session duration: 8 hours
- Idle timeout: 1 hour
7.3 Create Approval Team Members
Recommended composition (minimum 3 approvers):
| Role | Responsibility |
|---|---|
| CTO | Technical authority — verifies legitimacy of request |
| CISO | Security authority — assesses incident context |
| CFO or IT Director | Business authority — authorises operational impact |
For each approver, create a user in IAM Identity Centre:
- Username:
first.lastformat - Valid, monitored email address
- Job title and department (recommended)
- Phone number for out-of-band verification
Each user receives a 7-day invitation email to complete account setup (password + MFA registration).
7.4 Create the Approval Team
Region note: Approval teams are created in us-east-1 regardless of where your backup vault resides. This is an AWS service requirement — the approval team ARN will always reference
us-east-1, while your vault (e.g.eu-west-2) will reference it cross-region via the ARN during vault association.
In the external approval account (region: us-east-1):
- Navigate to AWS Backup → Approval teams → Create approval team
- Team name:
Production-Recovery-Team - Add all three approvers from IAM Identity Centre
- Minimum approvals: 2 (2-of-3 threshold balances security with availability)
Document the Approval Team ARN — store alongside the Vault ARN in your offline secure location.
Each team member receives an invitation email and must accept within 24 hours. All members must accept for the team to become active.
7.5 Test Approval Portal Access
Each member should independently verify access to: https://backup-approvals.aws.amazon.com/
Document the date of successful access test and schedule quarterly drill dates.
8. Phase 4 — Cross-Account Integration
8.1 Share Approval Team via AWS RAM
In the external approval account:
- Navigate to AWS Resource Access Manager → Create resource share
- Name:
Backup-Approval-Team-Share - Resource type: Backup: Approval Team → select
Production-Recovery-Team - Principal: AWS account → enter your production backup account ID
- ✅ Enable “Allow external principals” — critical for cross-organisation sharing
- Click Create resource share (status will show Pending)
8.2 Accept Resource Share in Backup Account
- Sign in to the production backup account
- Navigate to AWS RAM → Shared with me → Resource shares
- Select
Backup-Approval-Team-Share(status: Pending) - Click Accept resource share
Status changes to Active — the approval team is now accessible from your backup account.
8.3 Create and Apply Vault Access Policy
Navigate to Backup vaults → Production-AirGapped-Vault → Access policy → Edit policy.
Create a policy with three statements:
Statement 1 — Allow backup copy operations:
- Effect: Allow
- Principal:
backup.amazonaws.com - Action:
backup:CopyIntoBackupVault
Statement 2 — Require approval for restore:
- Effect: Allow
- Principal:
* - Actions:
backup:StartRestoreJob,backup:GetRecoveryPointRestoreMetadata - Condition:
backup:ApprovalTeamArnStringEquals<your approval team ARN>
Statement 3 — Deny destructive operations (for everyone, including root):
- Effect: Deny
- Principal:
* - Actions:
backup:DeleteRecoveryPoint,backup:DeleteBackupVault,backup:PutBackupVaultAccessPolicy
8.4 Associate Approval Team with Vault
- Navigate to the vault → Approval team tab → Assign approval team
- Select
Production-Recovery-Team(shared from external account) - Confirm the 2-of-3 approval threshold
- Click Assign approval team
Your air-gapped vault is now fully protected. Any restore operation requires multi-party approval from your external team.
9. Phase 5 — Disaster Recovery Runbook
This section answers the question the rest of the guide sets up: what do you actually do when ransomware hits?
9.1 Detection and Initial Response (0–60 minutes)
- Isolate affected systems — disconnect compromised VMs from the network immediately
- Do not reboot affected systems — volatile memory may contain forensic evidence
- Notify your incident response team and initiate your IR plan
- Verify backup vault integrity:
- Navigate to Backup vaults → Production-AirGapped-Vault
- Confirm lock status: Compliance / Permanent
- Confirm recovery points exist and are marked Completed
- Contact the external approval team — use out-of-band communication (phone, not email if email is compromised)
9.2 Request Emergency Vault Access (60–90 minutes)
In the production backup account:
- Navigate to AWS Backup → Backup vaults → Production-AirGapped-Vault
- Click Request access
- Complete the access request:
- Reason:
Ransomware incident — production systems encrypted, restore required - Requested access duration: 4–8 hours (minimum needed)
- Recovery points needed: list specific VM backups
- Reason:
- Submit request — approval team members are automatically notified
9.3 Approval Team Response (within 1–2 hours)
Each approver:
- Receives notification via email and AWS console alert
- Signs in to
https://backup-approvals.aws.amazon.com/using their credentials + MFA - Independently verifies the request via out-of-band call with the requester (do not rely solely on the AWS notification)
- Reviews: requester identity, reason, scope of access, duration
- Clicks Approve or Deny
Once 2 of 3 approvers approve, access is granted automatically.
9.4 Recovery Execution (2–8 hours post-approval)
Prioritise recovery order:
- Domain controllers / Active Directory
- Core infrastructure (DNS, DHCP, networking)
- Critical business applications (databases first)
- Secondary applications and file servers
For each VM restore:
- Navigate to Backup vaults → Production-AirGapped-Vault → Recovery points
- Select the most recent clean recovery point (pre-infection)
- Click Restore
- Restore settings:
- Target: clean hypervisor cluster (not the compromised one if possible)
- VM folder:
DisasterRecovery-<date> - Network: isolated VLAN for initial validation
- Monitor at Jobs → Restore jobs
Validate before reconnecting to production network:
- OS boots cleanly
- No ransomware indicators present
- Application data is intact
- Run antivirus/EDR scan on restored VM
- Only then reconnect to production network
9.5 Post-Recovery Actions
- [ ] Preserve forensic images of compromised systems before wiping
- [ ] Rotate all credentials (assume full compromise)
- [ ] Review CloudTrail logs in approval account for complete audit trail
- [ ] Conduct a post-incident review within 72 hours
- [ ] Update backup tags and policies based on lessons learned
- [ ] Run a full backup of recovered systems immediately
- [ ] Document actual RPO and RTO achieved vs targets
- [ ] Schedule follow-up DR drill within 90 days
10. Infrastructure as Code (Terraform)
The architecture described in this guide can be automated using Terraform. While a complete module is beyond the scope of this article, the key resources to define are:
# Key resources to implement in Terraform

resource "aws_backup_vault" "air_gapped" {
  name        = "Production-AirGapped-Vault"
  kms_key_arn = aws_kms_key.backup_vault.arn
  # Note: logically air-gapped vault type is set via vault_type parameter
  # Compliance-mode lock is applied separately via aws_backup_vault_lock_configuration
}

resource "aws_backup_vault_lock_configuration" "compliance" {
  backup_vault_name   = aws_backup_vault.air_gapped.name
  changeable_for_days = 3   # grace period
  min_retention_days  = 30
  max_retention_days  = 365
}

resource "aws_backup_plan" "vmware_daily" {
  name = "VMware-Production-Daily-Backup"
  rule {
    rule_name         = "DailyBackupRule"
    target_vault_name = "Default"
    schedule          = "cron(0 3 * * ? *)"
    lifecycle {
      cold_storage_after = 30
      delete_after       = 90
    }
    copy_action {
      destination_vault_arn = aws_backup_vault.air_gapped.arn
      lifecycle {
        cold_storage_after = 90
        delete_after       = 365
      }
    }
  }
}
Note: The external approval account, IAM Identity Centre configuration, and AWS RAM resource sharing require separate Terraform workspaces and state files, as they span multiple AWS accounts and organisations. Consider using Terragrunt for multi-account orchestration.
11. Conclusion
You have now implemented enterprise-grade ransomware protection for your VMware workloads using AWS Backup.
What we have Built
| Component | Status |
|---|---|
| VMware Backup Gateway | ✅ Connected and operational |
| Tag-based backup policies | ✅ Configured and tested |
| Air-gapped vault (compliance-mode lock) | ✅ Immutable and permanent |
| External approval authority | ✅ Separate organisation, MFA-enforced |
| Multi-party approval (2-of-3) | ✅ Required for all restore operations |
| Disaster recovery runbook | ✅ Tested and documented |
| Audit trail (CloudTrail) | ✅ Active in approval account |
Your Protection Against Common Attack Vectors
| Attack Scenario | Result |
|---|---|
| Ransomware deletes backups via admin credentials | ❌ Blocked by compliance-mode lock |
| Attacker accesses vault from compromised account | ❌ Blocked by air-gap and access policy |
| Attacker compromises entire AWS organisation | ❌ Cannot reach external approval team |
| Insider threat attempts backup deletion | ❌ Blocked — no one can bypass compliance lock |
| Accidental deletion of critical backups | ❌ Blocked by retention policy |
Even if ransomware attackers gain root access to every account in your organisation, they cannot access or delete your immutable backups without approval from external team members who are completely outside the compromised environment.
Key ARNs and Reference Information
Store the following in both a password manager and a physical secure location (safe):
Vault ARN:         arn:aws:backup:eu-west-2:YOUR-BACKUP-ACCOUNT-ID:backup-vault:Production-AirGapped-Vault
Approval Team ARN: arn:aws:backup:us-east-1:YOUR-EXTERNAL-ACCOUNT-ID:approval-team/Production-Recovery-Team
KMS Key ARN:       arn:aws:kms:eu-west-2:YOUR-BACKUP-ACCOUNT-ID:key/YOUR-KMS-KEY-ID
Approval Portal:   https://backup-approvals.aws.amazon.com/
This implementation guide is designed for organisations deploying AWS Backup for VMware with logically air-gapped vaults and external approval teams. All examples should be adapted to your specific environment, account IDs, regions, and organisational requirements. Costs are indicative and should be validated using the AWS Pricing Calculator for your specific data volumes.